Currently, while pursuing my Masters at the Savannah College of Art and Design, I am taking a class called Creature Look Development. Sadly, we do not actually design any creatures and had to have our model before the first day of class. Most of class thus far has been taken up with the details of what bring a character to life, from the eyes to the way light interacts with skin.
1) Concept
Before touching a polygon, one must first have a concept. As my thesis will be taking place in a strange, warped, and child-like version of Atlantis, I wanted to focus on a creature that lives there. This creature is by no means the main character and in fact is never directly featured on screen, I wanted to use a side-character in the plot as a way of learning the skills to make my main characters. The creature would be one of many to entrance our hero as he travels to Atlantis atop his floating couch.
My mental concept was quite a bit darker initially, but seeing the character through the interpretation of another pushed me toward my final design.
Bits and pieces translated to the design below that I ended up importing into Maya.
It is of the utmost of importance that an artist has a full and complete plan for their creature, a process book of sorts that allows them to communicate with the team exactly what they need. Not only is this helpful when building as texture reference library, as you know exactly what it is for, but it keeps everyone on the same page.
Inspiration pages help set thematic and visual tones for the entire team to follow!
2) Model
Before loading the blueprint images into Maya, be sure to draw everything you need to successfully model the creature from several angles.
I usually load the file into the Color channel on a Lambert shader and crank the Ambient Color to the max. After setting up several poly-planes, I apply the shader to them and cut the excess plane away. I used Maya 2012 and found the new Interactive Split Tool to be utter bollocks. You COULD delete your prefs and dive into a ton of menus to dig up the old one...or you could just run this MEL script and save it to your shelf for the future... SplitPolygonTool;
Box modeling is the technique I usually start with and is surprisingly simple to pull off. Simply create a polygon box and using the Edge Loop tool and the Extrude function, create a rough model.
For rigging and animating purposes, a model must be more relaxed than the one in my picture is.
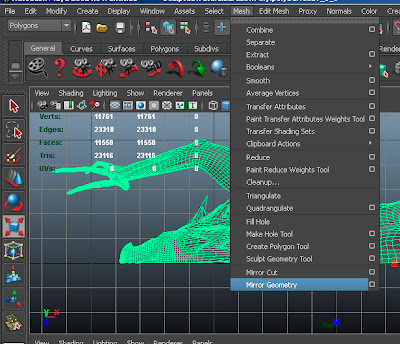
I fixed this later in the process but will show you now as it would have saved much time if I had realized it this early in the process. Start by cutting your model in half, select all the faces you don't want and delete them. Select the remaining half and go to
Mesh and click
Mirror Geometry.
In your Channel Box / Layer Editor change the direction of the polyMirror#, I had to change mine to +Z to get it to work properly.
In the same section change the Merge Mode to Merge Border Vertices.
This is why it is so important to get a clean cut when halving your model...or you could just do it right from the beginning! :P If there are still gaps, go in with the Merge Vertex Tool to clean things up.
Regardless of whether you nailed it first shot or had to fix the model up, remember to go to Edit, Delete All by Type, and select History, before exporting the base mesh of the model to a sculpting and surfacing program.
2) Sculpt
You now have a low-poly base mesh, what should you do with it?
I recommend using Mari, Mudbox, or ZBrush to continue with your model.
Mari is quickly taking the industry by storm but will very quickly crash your computer unless you have an insane rig. Upon opening, the program defaults to 4K...that's how awesome it is!
Mudbox is great for a streamlined and easy to learn approach if you are using Autodesk software, it plugs right into the pipeline with minimal fuss and quite a bit of power and functionality. If you are just starting to sculpt/paint and you want something that is a mix of Maya and Photoshop, I would immediately recommend Mudbox.
ZBrush is a complicated powerhouse. It has a steep learning curve but many people swear by it and, in its defense, is capable of truly amazing things! The makers of ZBrush also have an entirely free sculpting program on the market called Sculptris that is actually quite good as well. I made a review of that program as well as others
here.
As the world of sculpting is not part of the class, here are some great tutorials to get you started.
3) UVs
Why are UVs important?
The truth is, they are increasingly becoming unimportant as the world of Visual Effects and Animation bounds forward in technology.
A brand new form of displacement, developed by Disney and used by Pixar, is the technique known as PTEX. Through my research, I have uncovered several methods of using this amazing technology.
Here are several tutorials I have written on the topic.
(I recommend this method, it is both easier to set up and more accurate)
However, not everyone has access to Renderman or the patience to fiddle with the intricacies of Houdini.
If you must fiddle with UVs and the archaic problems it presents, a good workflow I have found is to start with the model (.obj) in a free program called
Roadkill.
The navigation tools should be familiar to you, and it is quite easy to quickly cut up your model.
A word of warning, Roadkill does not recognize Ctrl + s as a save hotkey. Be sure to save progress by going into the menu and manually clicking the Save button. Annoying, yes...but the program handles unwrapping the UVs so well that this glitch is easy to overlook.
You want the little blocks to be the same size across the entire creature with zero stretching. It used to be important to hide the seams but with tools like Projection Painting in every tool mentioned in the sculpt section, this is much less important now than it used to be if you handle the painting correctly.
A great map to use for checking the model for stretch and distortion is a numbered, colored grid.
This lets you be more precise about your UV cuts and welds as you can refer to sections specifically. You may have noticed, but Roadkill is not great about making the best use of space on your UV map. I usually bring the model back into Maya and re-arrange my maps before continuing on to the land of painting.
4) Texture
It is important at this stage to closely follow the style-guidebook you created at the beginning of the process.
Whew, that was extensive. Now back to work.
I carry a camera with me nearly everywhere I go and snap texture reference, so my texture library is quite large. Using the above pages as a guide I then build a specific library for the creature, like a palette for a fine artist. I work as large as possible and always make my textures tile-able in Photoshop so that I can just use the Stencil tools in Mudbox and ZBrush without worrying about where I am on the texture map.
Since I love painting in Photoshop, my brain is wired to understand layers.
I usually paint the following layers in the following arrangement using my Wacom Tablet.
Painted Fine Detail and Texture Fixing
Painted Detail
Detail Photographic Texture at low opacity
Messy Photographic Texture
Here are some results I have gotten very quickly:
5) The Eye
Eyes are complicated things, eyes without the necessary life in them will create undead digital monsters. I suppose I could argue that my creature IS a monster, so lifeless eyes suit him, however, that would not let me learn from this assignment.
When modeling an eyeball in Maya, it is essentially two spheres and one distorted plane.
The outer sphere is a fully transparent and very reflective, I used a Blinn and added a very light bump map to it in order to lightly break up the reflections.
The inner sphere is white, I just used Maya's marble texture with the veins changed to be red. I plugged this into the bump map connection and inverted it so that the veins in the eye were slightly raised.
In order to texture the plane, I painted over photographs of my girlfriend's eye, my own eye, and that of a crocodile in order to produce color and bump maps.
Here is a rough of the eye.
6) Hair and Fur
As my creature is a bit lizard-like, he is severely lacking in the hair/fur department.
Here is a quick breakdown as to what Maya offers:
Fur - takes a while to render, but is very direct-able and produces beautiful results.
Hair - reacts to the forces of gravity, is dynamic.
If this is something you are looking for in your creature/character, I have written a comprehensive tutorial on setting up Fur and linking it to the behavior of Hair.
I was very inspired by Pixar's new film when writing the tutorial, so the example used is from Brave.
Hair so amazing, it is it's own character!
7) Sub-Surface Scattering
Sub-Surface Scattering occurs when light shines through something solid, like when you hold a powerful flashlight behind your hand and the entire hand glows red for example.

My method is to typically use the Mental Ray Fast Skin SSS shader and tweak it to full potential.
Many people plug texture maps into the various inputs on this shader, but a method that works better for me personally is to just render the SSS as a seperate pass and then composite it onto the creature in a program like Nuke.
No matter where you are in skill level, a refresher is always of benefit.
I did not write the following tutorials, but can attest to their accuracy.
Final Thoughts
It is important to test your creature in a variety of light setups in order to ensure that the shaders and textures will hold up in a large variety of circumstances. In a film production pipeline, your creature will share the screen with many other elements and it must be adaptable in order to make integration less of a nightmare.
Hopefully this overview has provided good insight for you to create your own workflow. I look forward to modifying, fine-tuning, and overhauling my personal workflow as I progress and grow as an artist.
Happy creation!
Josh Evans


